Account Backups: Difference between revisions
m Add Tutorials category tag to the page |
|||
| (11 intermediate revisions by the same user not shown) | |||
| Line 1: | Line 1: | ||
= Plesk Account Backups = | == Plesk Account Backups == | ||
= Where to Download Your Account Backup = | == Where to Download Your Account Backup == | ||
If the HelioHost team made a backup of your hosting account data, you can retrieve it by visiting [https://heliohost.org/backup/ heliohost.org/backup] and following the instructions on the page to download the file. | If the HelioHost team made a backup of your hosting account data, you can retrieve it by visiting [https://heliohost.org/backup/ heliohost.org/backup] and following the instructions on the page to download the file. | ||
Inside the downloaded backup file, there will be a large file named | Inside the downloaded backup file, there will be a large file named 'backup_user-data_##########.tzst' which contains all your files. | ||
The file will be in a format called | The file will be in a format called 'Z-standard' and will need to be extracted. | ||
= How to Extract Your Account Data from the Backup File = | == How to Extract Your Account Data from the Backup File == | ||
= Linux or Mac = | == Linux or Mac == | ||
On Linux or Mac you can install the | On Linux or Mac you can install the 'zstd' package and extract it on the command line. | ||
= Access Your Files in Ubuntu v22+ = | == Access Your Files in Ubuntu v22+ == | ||
* Navigate to the directory containing your backup file named | * Navigate to the directory containing your backup file named 'pleskbackup-YourAccountUsername.tar' | ||
* Install the | * Install the 'zstd' package with the <code>sudo apt install zstd</code> command | ||
* Untar the downloaded file with the | * Untar the downloaded file with the <code>tar -xvf pleskbackup-YourAccountUsername.tar</code> command | ||
* You should see a list of filenames similar to the below: | * You should see a list of filenames similar to the below: | ||
<pre> | <pre> | ||
domains/YourAccountUsername.helioho.st/backup_user-data_ | domains/YourAccountUsername.helioho.st/backup_user-data_##########.tzst <--- Your account data | ||
domains/YourAccountUsername.helioho.st/backup_apache-files_ | domains/YourAccountUsername.helioho.st/backup_apache-files_##########.tzst | ||
domains/YourAccountUsername.helioho.st/backup_pd_ | domains/YourAccountUsername.helioho.st/backup_pd_##########.tzst | ||
domains/YourAccountUsername.helioho.st/backup_conf_ | domains/YourAccountUsername.helioho.st/backup_conf_##########.tzst | ||
domains/YourAccountUsername.helioho.st/backup_logs_ | domains/YourAccountUsername.helioho.st/backup_logs_##########.tzst | ||
domains/YourAccountUsername.helioho.st/backup_statistics_ | domains/YourAccountUsername.helioho.st/backup_statistics_##########.tzst | ||
domains/YourAccountUsername.helioho.st/backup_domainmail_ | domains/YourAccountUsername.helioho.st/backup_domainmail_##########.tzst | ||
backup_action-log_ | backup_action-log_##########.tzst | ||
domains/YourAccountUsername.helioho.st/.discovered/backup_info_ | domains/YourAccountUsername.helioho.st/.discovered/backup_info_##########/props | ||
domains/YourAccountUsername.helioho.st/.discovered/backup_info_ | domains/YourAccountUsername.helioho.st/.discovered/backup_info_##########/cid_user-data | ||
domains/YourAccountUsername.helioho.st/.discovered/backup_info_ | domains/YourAccountUsername.helioho.st/.discovered/backup_info_##########/cid_apache-files | ||
domains/YourAccountUsername.helioho.st/.discovered/backup_info_ | domains/YourAccountUsername.helioho.st/.discovered/backup_info_##########/cid_domainmail_472 | ||
domains/YourAccountUsername.helioho.st/.discovered/backup_info_ | domains/YourAccountUsername.helioho.st/.discovered/backup_info_##########/status_OK | ||
domains/YourAccountUsername.helioho.st/.discovered/backup_info_ | domains/YourAccountUsername.helioho.st/.discovered/backup_info_##########/object_index | ||
domains/YourAccountUsername.helioho.st/backup_info_ | domains/YourAccountUsername.helioho.st/backup_info_##########.xml | ||
.discovered/backup_info_ | .discovered/backup_info_##########/props | ||
.discovered/backup_info_ | .discovered/backup_info_##########/status_OK | ||
.discovered/backup_info_ | .discovered/backup_info_##########/dumpresult_SUCCESS | ||
.discovered/backup_info_ | .discovered/backup_info_##########/object_index | ||
.discovered/backup_info_ | .discovered/backup_info_##########/webcontent_index | ||
backup_info_ | backup_info_##########.xml | ||
dump-header | dump-header | ||
dump-index | dump-index | ||
| Line 49: | Line 49: | ||
</pre> | </pre> | ||
* There will be several | * There will be several '.tzst' files inside that you can extract using the 'unzstd' command | ||
* Your account data is located at | * Your account data is located at 'domains/YourAccountUsername.helioho.st/backup_user-data_##########.tzst' | ||
* Navigate to the | * Navigate to the 'domains' directory | ||
* Navigate to the | * Navigate to the 'YourAccountUsername.helioho.st' directory | ||
* Extract your data from the | * Extract your data from the 'backup_user-data_##########.tzst' file with the <code>unzstd backup_user-data_##########.tzst</code> command | ||
* Your data will then be extracted to a | * Your data will then be extracted to a '.tar' file called 'backup_user-data_##########.tar' | ||
* Untar the file with the | * Untar the file with the <code>tar -xvf backup_user-data_##########.tar</code> command | ||
* You should see a list of your site files and directories. For example: | * You should see a list of your site files and directories. For example: | ||
| Line 65: | Line 65: | ||
</pre> | </pre> | ||
= Windows = | == Windows == | ||
On Windows you can use [https://www.win-rar.com/ WinRar v6+] or [https://www.7-zip.org/ 7-Zip v24+]. | On Windows you can use [https://www.win-rar.com/ WinRar v6+] or [https://www.7-zip.org/ 7-Zip v24+]. | ||
= Access Your Files = | == Access Your Files == | ||
* Navigate to the main backup file named | * Navigate to the main backup file named 'pleskbackup-YourAccountUsername.tar' | ||
* Extract the | * Extract the '.tar' file using one of the software packages listed above | ||
* The files will be extracted to a folder named | * The files will be extracted to a folder named 'pleskbackup-YourAccountUsername' | ||
* Open the folder and navigate to the | * Open the folder and navigate to the 'domains' folder | ||
* Open the next folder, named | * Open the next folder, named 'YourAccountUsername.heliohost.us' or 'YourAccountUsername.helioho.st' | ||
* Navigate to the file named | * Navigate to the file named 'backup_user-data_##########.tzst' | ||
* Open the file to access your data | * Open the file to access your data | ||
[[File: extract-plesk-backup-file.png]] | [[File: extract-plesk-backup-file.png]] | ||
= Making Your Own Manual Account Backup = | == Making Your Own Manual Account Backup == | ||
As mentioned in our [[: | {{Danger|As mentioned in our [[:Terms|Terms of Service]], it is not HelioHost's responsibility to keep backups of your data. | ||
We strongly recommend that you '''back up your data regularly by downloading it to your local device''' and store it in a safe place. | |||
If you | If the only place you keep your backups is inside Plesk, '''you risk data loss''' in the rare event of an issue with your hosting account. | ||
Follow the navigation steps below to make a backup of your hosting account inside Plesk | If you [[:FAQ#How_do_I_reset_my_hosting_account_to_start_fresh? | request an account reset]] and did not first '''download your backup''' from Plesk, the backup files will be deleted, along with everything else on your account, as part of the account reset process.}} | ||
Backups created through Plesk count towards your [[Storage | 1000 MB account storage limit]]. To avoid [[:Suspension_Policy#Account_Storage_Limits|account suspension for exceeding your disk quota]], we strongly recommend '''regularly downloading your backups''' and deleting the older ones to free up space inside your Plesk account. | |||
If you need more space, you can [[:Donations_for_Increased_Storage|donate to increase your account storage]] from 1000 MB up to a maximum of 7000 MB total. For even more storage, we offer [https://heliohost.org/vps/ VPS plans] with space ranging from 50 GB to 300 GB, and a 10% discount when you pay for 6 months upfront. | |||
Follow the navigation steps below to make a backup of your hosting account inside Plesk. '''The backup file should then be downloaded to your local computer and kept in a safe place.''' | |||
'''Login > Plesk > Websites & Domains > [ domain ] > Backup & Restore''' | '''Login > Plesk > Websites & Domains > [ domain ] > Backup & Restore''' | ||
| Line 96: | Line 101: | ||
[[File:plesk-make-account-backup.png]] | [[File:plesk-make-account-backup.png]] | ||
Click the | Click the 'Back Up' button: | ||
[[File:plesk-make-account-backup-2.png]] | [[File:plesk-make-account-backup-2.png]] | ||
Select the account content you want to back up, and click on the | Select the account content you want to back up, and click on the 'OK' button: | ||
[[File:plesk-select-backup-content.png]] | [[File:plesk-select-backup-content.png]] | ||
= Downloading a Local Copy of Your Backup = | == Downloading a Local Copy of Your Backup == | ||
Once the backup process finishes, | Once the backup process finishes, '''download the backup file to your local computer''' by clicking on the green arrow icon. | ||
'''Failing to download a copy of the backup could result in data loss or file corruption in the rare event of an issue with your hosting account.''' | |||
[[File:plesk-download-backup-file.png]] | [[File:plesk-download-backup-file.png]] | ||
Make your selection about using a password to encrypt users' passwords contained in the Plesk database or not, and click on the | Make your selection about using a password to encrypt users' passwords contained in the Plesk database or not, and click on the 'OK' button: | ||
[[File:plesk-download-backup-file-2.png]] | [[File:plesk-download-backup-file-2.png]] | ||
Your backup file will be downloaded to your local machine with filename | Your backup file will be downloaded to your local machine with filename 'backup_domain.helioho.st_##########.tar' | ||
= Scheduling Automated Account Backups = | == Scheduling Automated Account Backups == | ||
Follow the navigation steps below to set up or modify scheduled account backup settings inside Plesk: | Follow the navigation steps below to set up or modify scheduled account backup settings inside Plesk: | ||
| Line 124: | Line 131: | ||
[[File:plesk-schedule-account-backup.png]] | [[File:plesk-schedule-account-backup.png]] | ||
After clicking the | After clicking the 'Schedule' button, adjust the settings as needed. | ||
== Limiting the Number of Backups Stored in Plesk == | |||
If you need more space, you can [[:Donations_for_Increased_Storage|donate to increase your account storage]] from 1000 MB up to a maximum of | Backup files count towards your 1000 MB account storage limit, so we recommend filling in the 'Maximum number of full backup files to store' field to a number that makes sense for the total filesize of your account. Otherwise if you leave this field blank, backup files will pile up and increase your file storage unnecessarily, leaving you at risk of [[:Suspension_Policy|account suspension for exceeding your disk quota]]. | ||
'''The backup files should be downloaded regularly to your local computer and kept in a safe place.''' | |||
If you need more space, you can [[:Donations_for_Increased_Storage|donate to increase your account storage]] from 1000 MB up to a maximum of 7000 MB total. For even more storage, we offer [https://heliohost.org/vps/ VPS Plans] with space ranging from 50 GB to 300 GB, and a 10% discount when you pay for 6 months upfront. | |||
[[File:plesk-max-number-of-backups.png]] | [[File:plesk-max-number-of-backups.png]] | ||
= Restoring Your Account Backup = | == Restoring Your Account Backup == | ||
Backups '''cannot''' be restored directly in Plesk using the | Backups '''cannot''' be restored directly in Plesk using the 'Restore' button. | ||
To restore a backup, you must first extract the backup file on your local machine, then upload the specific parts you need. | To restore a backup, you must first [[:#How_to_Extract_Your_Account_Data_from_the_Backup_File | extract the backup file]] on your local machine, then upload the specific parts you need. | ||
= Repairing Damaged Backup Files = | == Repairing Damaged Backup Files == | ||
If you have trouble when trying to extract a backup file, try opening it in a hex editor to inspect or repair the file. The screenshots below use | If you have trouble when trying to extract a backup file, try opening it in a hex editor to inspect or repair the file. The screenshots below use 'frhed', a free and easy-to-use hex editor, but the process should be similar in other hex editors. | ||
1. View the damaged | 1. View the damaged 'tzst' file inside the hex editor. You will likely see an error message right at the top. In this example, the error message starts with 'Unable to getpwnam for user', but other error messages are possible. | ||
[[File:plesk-account-backup-damaged-file.png]] | [[File:plesk-account-backup-damaged-file.png]] | ||
2. Find the magic bytes (which should be | 2. Find the magic bytes (which should be '28 B5 2F FD') in the file, as highlighted in the example. | ||
3. Delete everything before the magic bytes. | 3. Delete everything before the magic bytes. | ||
| Line 156: | Line 167: | ||
5. Save the file. When you try to extract it again, the issue should be resolved. | 5. Save the file. When you try to extract it again, the issue should be resolved. | ||
= Further Support = | == Further Support == | ||
If you get stuck after following the instructions above, please go back and check all of your steps again. If you can't figure out what is wrong, please post a topic in the [https://helionet.org/index/forum/45-customer-service/?do=add Customer Support forum]. Please make sure you provide | If you get stuck after following the instructions above, please go back and check all of your steps again. If you can't figure out what is wrong, please post a topic in the [https://helionet.org/index/forum/45-customer-service/?do=add Customer Support forum]. Please make sure you provide: | ||
# Your hosting account '''username''' | |||
# Details of the problem, including what steps you have tried, and any '''error message(s)''' encountered | |||
= References = | == References == | ||
Sections of this tutorial have been adapted from posts about [https://helionet.org/index/topic/58777-solved-suspended-account/#comment-260423 extracting Plesk backup files] and [https://helionet.org/index/topic/61744-solved-unable-to-restore-backup-in-plesk/#comment-275392 repairing a damaged backup file] on the HelioNet forum. | Sections of this tutorial have been adapted from posts about [https://helionet.org/index/topic/58777-solved-suspended-account/#comment-260423 extracting Plesk backup files] and [https://helionet.org/index/topic/61744-solved-unable-to-restore-backup-in-plesk/#comment-275392 repairing a damaged backup file] on the HelioNet forum. | ||
[[Category:Tutorials]] | |||
Latest revision as of 03:40, 13 July 2025
Plesk Account Backups
Where to Download Your Account Backup
If the HelioHost team made a backup of your hosting account data, you can retrieve it by visiting heliohost.org/backup and following the instructions on the page to download the file.
Inside the downloaded backup file, there will be a large file named 'backup_user-data_##########.tzst' which contains all your files.
The file will be in a format called 'Z-standard' and will need to be extracted.
How to Extract Your Account Data from the Backup File
Linux or Mac
On Linux or Mac you can install the 'zstd' package and extract it on the command line.
Access Your Files in Ubuntu v22+
- Navigate to the directory containing your backup file named 'pleskbackup-YourAccountUsername.tar'
- Install the 'zstd' package with the
sudo apt install zstdcommand - Untar the downloaded file with the
tar -xvf pleskbackup-YourAccountUsername.tarcommand - You should see a list of filenames similar to the below:
domains/YourAccountUsername.helioho.st/backup_user-data_##########.tzst <--- Your account data
domains/YourAccountUsername.helioho.st/backup_apache-files_##########.tzst
domains/YourAccountUsername.helioho.st/backup_pd_##########.tzst
domains/YourAccountUsername.helioho.st/backup_conf_##########.tzst
domains/YourAccountUsername.helioho.st/backup_logs_##########.tzst
domains/YourAccountUsername.helioho.st/backup_statistics_##########.tzst
domains/YourAccountUsername.helioho.st/backup_domainmail_##########.tzst
backup_action-log_##########.tzst
domains/YourAccountUsername.helioho.st/.discovered/backup_info_##########/props
domains/YourAccountUsername.helioho.st/.discovered/backup_info_##########/cid_user-data
domains/YourAccountUsername.helioho.st/.discovered/backup_info_##########/cid_apache-files
domains/YourAccountUsername.helioho.st/.discovered/backup_info_##########/cid_domainmail_472
domains/YourAccountUsername.helioho.st/.discovered/backup_info_##########/status_OK
domains/YourAccountUsername.helioho.st/.discovered/backup_info_##########/object_index
domains/YourAccountUsername.helioho.st/backup_info_##########.xml
.discovered/backup_info_##########/props
.discovered/backup_info_##########/status_OK
.discovered/backup_info_##########/dumpresult_SUCCESS
.discovered/backup_info_##########/object_index
.discovered/backup_info_##########/webcontent_index
backup_info_##########.xml
dump-header
dump-index
archive-index
- There will be several '.tzst' files inside that you can extract using the 'unzstd' command
- Your account data is located at 'domains/YourAccountUsername.helioho.st/backup_user-data_##########.tzst'
- Navigate to the 'domains' directory
- Navigate to the 'YourAccountUsername.helioho.st' directory
- Extract your data from the 'backup_user-data_##########.tzst' file with the
unzstd backup_user-data_##########.tzstcommand - Your data will then be extracted to a '.tar' file called 'backup_user-data_##########.tar'
- Untar the file with the
tar -xvf backup_user-data_##########.tarcommand - You should see a list of your site files and directories. For example:
httpdocs/
httpdocs/cgi-bin/
httpdocs/index.html
...
Windows
On Windows you can use WinRar v6+ or 7-Zip v24+.
Access Your Files
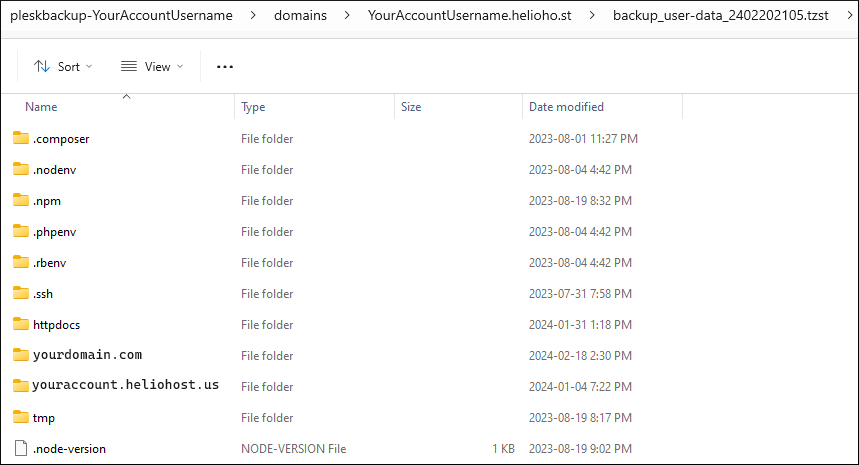
- Navigate to the main backup file named 'pleskbackup-YourAccountUsername.tar'
- Extract the '.tar' file using one of the software packages listed above
- The files will be extracted to a folder named 'pleskbackup-YourAccountUsername'
- Open the folder and navigate to the 'domains' folder
- Open the next folder, named 'YourAccountUsername.heliohost.us' or 'YourAccountUsername.helioho.st'
- Navigate to the file named 'backup_user-data_##########.tzst'
- Open the file to access your data
Making Your Own Manual Account Backup

As mentioned in our Terms of Service, it is not HelioHost's responsibility to keep backups of your data.
We strongly recommend that you back up your data regularly by downloading it to your local device and store it in a safe place.
If the only place you keep your backups is inside Plesk, you risk data loss in the rare event of an issue with your hosting account.
If you request an account reset and did not first download your backup from Plesk, the backup files will be deleted, along with everything else on your account, as part of the account reset process.
Backups created through Plesk count towards your 1000 MB account storage limit. To avoid account suspension for exceeding your disk quota, we strongly recommend regularly downloading your backups and deleting the older ones to free up space inside your Plesk account.
If you need more space, you can donate to increase your account storage from 1000 MB up to a maximum of 7000 MB total. For even more storage, we offer VPS plans with space ranging from 50 GB to 300 GB, and a 10% discount when you pay for 6 months upfront.
Follow the navigation steps below to make a backup of your hosting account inside Plesk. The backup file should then be downloaded to your local computer and kept in a safe place.
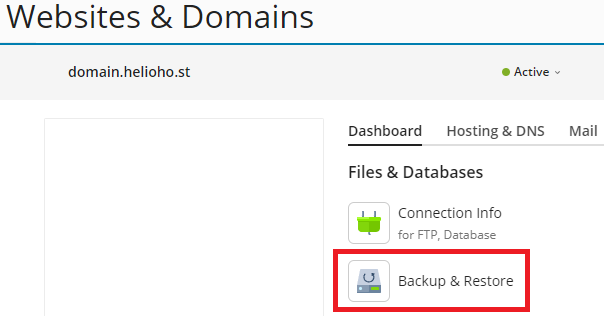
Login > Plesk > Websites & Domains > [ domain ] > Backup & Restore
Click the 'Back Up' button:
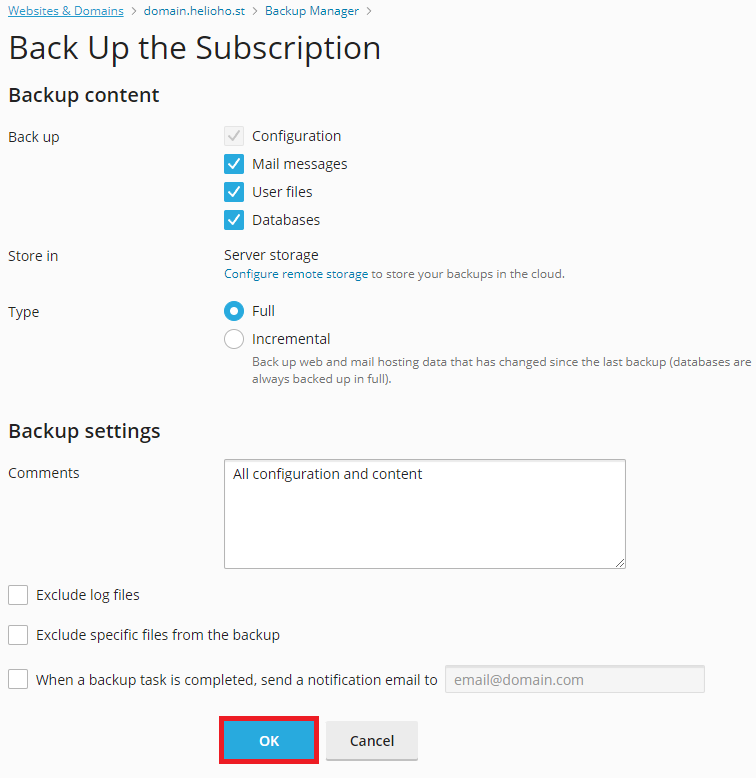
Select the account content you want to back up, and click on the 'OK' button:
Downloading a Local Copy of Your Backup
Once the backup process finishes, download the backup file to your local computer by clicking on the green arrow icon.
Failing to download a copy of the backup could result in data loss or file corruption in the rare event of an issue with your hosting account.
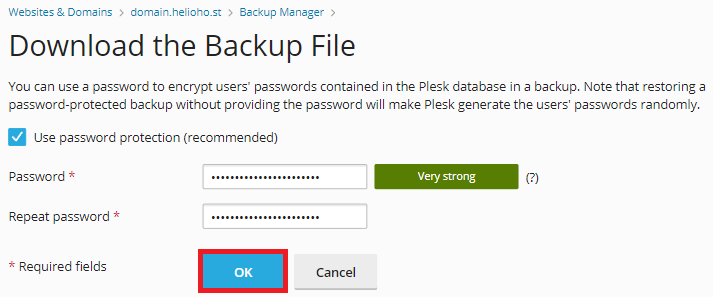
Make your selection about using a password to encrypt users' passwords contained in the Plesk database or not, and click on the 'OK' button:
Your backup file will be downloaded to your local machine with filename 'backup_domain.helioho.st_##########.tar'
Scheduling Automated Account Backups
Follow the navigation steps below to set up or modify scheduled account backup settings inside Plesk:
Login > Plesk > Websites & Domains > [ domain ] > Backup & Restore > Schedule
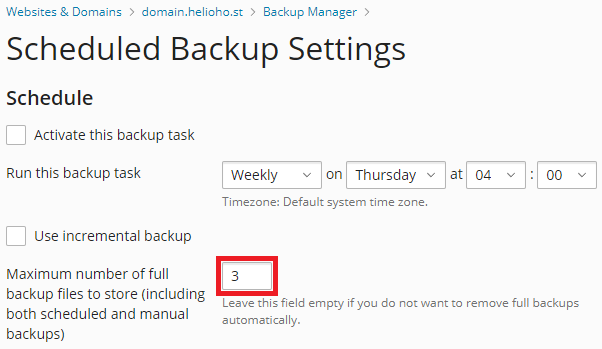
After clicking the 'Schedule' button, adjust the settings as needed.
Limiting the Number of Backups Stored in Plesk
Backup files count towards your 1000 MB account storage limit, so we recommend filling in the 'Maximum number of full backup files to store' field to a number that makes sense for the total filesize of your account. Otherwise if you leave this field blank, backup files will pile up and increase your file storage unnecessarily, leaving you at risk of account suspension for exceeding your disk quota.
The backup files should be downloaded regularly to your local computer and kept in a safe place.
If you need more space, you can donate to increase your account storage from 1000 MB up to a maximum of 7000 MB total. For even more storage, we offer VPS Plans with space ranging from 50 GB to 300 GB, and a 10% discount when you pay for 6 months upfront.
Restoring Your Account Backup
Backups cannot be restored directly in Plesk using the 'Restore' button.
To restore a backup, you must first extract the backup file on your local machine, then upload the specific parts you need.
Repairing Damaged Backup Files
If you have trouble when trying to extract a backup file, try opening it in a hex editor to inspect or repair the file. The screenshots below use 'frhed', a free and easy-to-use hex editor, but the process should be similar in other hex editors.
1. View the damaged 'tzst' file inside the hex editor. You will likely see an error message right at the top. In this example, the error message starts with 'Unable to getpwnam for user', but other error messages are possible.
2. Find the magic bytes (which should be '28 B5 2F FD') in the file, as highlighted in the example.
3. Delete everything before the magic bytes.
4. After making this change, the magic bytes should display as being the first bytes in the file, as shown below:
5. Save the file. When you try to extract it again, the issue should be resolved.
Further Support
If you get stuck after following the instructions above, please go back and check all of your steps again. If you can't figure out what is wrong, please post a topic in the Customer Support forum. Please make sure you provide:
- Your hosting account username
- Details of the problem, including what steps you have tried, and any error message(s) encountered
References
Sections of this tutorial have been adapted from posts about extracting Plesk backup files and repairing a damaged backup file on the HelioNet forum.
