Google Site Verification: Difference between revisions
Update screenshot to make it more clear users should select the "URL prefix" option inside Google Search Console |
|||
| (4 intermediate revisions by the same user not shown) | |||
| Line 1: | Line 1: | ||
== Google Site Verification == | == Google Site Verification == | ||
Users can verify their own domains via [https://support.google.com/webmasters/answer/9008080?hl=en#html_verification HTML file upload] without the need to contact an admin or use external DNS. | Users can verify their own domains via [https://support.google.com/webmasters/answer/9008080?hl==en#html_verification HTML file upload] without the need to contact an admin or use external DNS. | ||
== Login to Google Search Console == | == Login to Google Search Console == | ||
Go to Google Search Console at [https://search.google.com/search-console | Go to Google Search Console at [https://search.google.com/search-console/ search.google.com/search-console], click on the 'Start Now' button, and log in or create an account. | ||
== Select | == Select 'URL prefix' Option == | ||
Select the | Select the '''URL prefix''' option, enter the URL for your site, and click on the 'Continue' button. | ||
[[File:google-verification-URL-prefix-option.png]] | |||
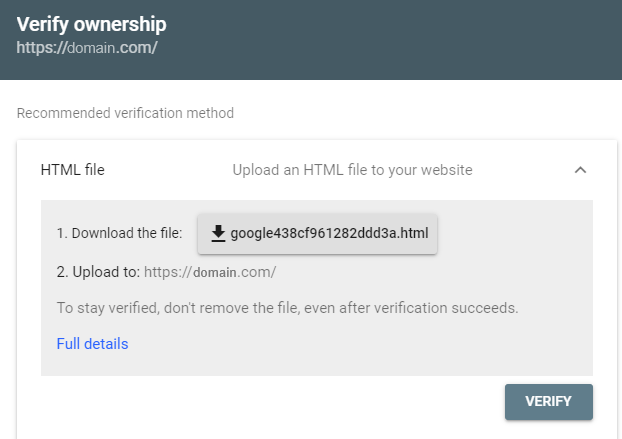
== Place the provided | == Place the provided 'HTML' file on your website == | ||
[[File:google-verification-html-file.png]] | |||
[[Category:Tutorials]] | |||
Latest revision as of 23:33, 3 November 2025
Google Site Verification
Users can verify their own domains via HTML file upload without the need to contact an admin or use external DNS.
Login to Google Search Console
Go to Google Search Console at search.google.com/search-console, click on the 'Start Now' button, and log in or create an account.
Select 'URL prefix' Option
Select the URL prefix option, enter the URL for your site, and click on the 'Continue' button.
Place the provided 'HTML' file on your website
This page was last edited on 3 November 2025, at 23:33.

