VPS Nodejs: Difference between revisions
No edit summary |
Unknown025 (talk | contribs) m Minor formatting and grammar changes. |
||
| (29 intermediate revisions by one other user not shown) | |||
| Line 1: | Line 1: | ||
== Getting Started == | |||
[[ | [[File:vpsnode1.jpg|500px|right]] | ||
In https://heliohost.org/chat/ say you are getting a VPS and | In https://heliohost.org/chat/, say you are getting a VPS and would like it to come with Hestia installed on it. Hestia is the control panel we will be using. If you don't want to pay with PayPal, you may also ask for an alternate payment link. | ||
You should get an email listing your | You should get an email listing your dedicated IP, port, and other info for logging in. You will need an SFTP client such as [https://filezilla-project.org/ FileZilla] to upload files, as well as an SSH client. I personally use and prefer https://termius.com/, because I like the terminal and it doesn't weirdly close for no reason. I also use NMM File Manager from the [https://play.google.com/store/apps/details?id=in.mfile&pli=1 Google Play Store] for editing the files of the server, since Termius can't do that. | ||
== In to Hestia == | |||
Before we log in to the apps, let's try logging in to Hestia. In your email see where it says your domain is vps###.heliohost.us? ### refers to your specific number in the email. Add a :8083 so the link is vps###.heliohost.us:8083 and go to it in your browser. You should find a login page with the username being 'admin' and password being your password. Enter those and you are in the Hestia Control Panel. Explore around it a bit. | Before we log in to the apps, let's try logging in to Hestia. In your email see where it says your domain is <code>vps###.heliohost.us</code>? ### refers to your specific number in the email. Add a <code>:8083</code> so the link is <code>vps###.heliohost.us:8083</code> and go to it in your browser. You should find a login page with the username being 'admin' and password being your password. Enter those and you are in the Hestia Control Panel. Explore around it a bit. | ||
Now lets change account setting from nologin to bash, and link our first domain. | Now lets change account setting from nologin to bash, and link our first domain. | ||
To change from nologin to bash, touch the three bars below the top three bars, go to users, and touch the admin user. Go to the bottom where it says Advanced Options, and change nologin to bash. | To change from nologin to bash, touch the three bars below the top three bars, go to users, and touch the admin user. Go to the bottom where it says Advanced Options, and change nologin to bash. | ||
[[File:vpsnode2.jpg]] | |||
Now lets add a domain so u can have the node site online somewhere. If you ask in support chat they can give you a free heliohost domain to build with. | |||
Touch the 3 bars again and go to Web. Add a new domain with the address and ip. Enable SSL in advanced options. Mine looks like this. | Touch the 3 bars again and go to Web. Add a new domain with the address and ip. Enable SSL in advanced options. Mine looks like this. | ||
[[File:vpsnode3.jpg]] | |||
== Terminal Stuff == | |||
Now let's open Termius and log in. | Now let's open Termius and log in. | ||
I would take screenshots but Termius doesn't let me. Skip the logging in and ai stuff of termius and go straight to Hosts and make a new host. Set the ip to either of the ips from your email. I use the ipv6 one and no idea if there are limitations using the ipv4 one or not. :) | I would take screenshots but Termius doesn't let me. Skip the logging in and ai stuff of termius and go straight to Hosts and make a new host. Set the ip to either of the ips from your email. I use the ipv6 one and no idea if there are limitations using the ipv4 one or not. :) | ||
port should already be on 22 correctly and enter username | port should already be on 22 correctly and enter username <code>admin</code> and your password. | ||
[[File:vpsnode4.jpg]] | |||
You will find terminal stuff is filled with Permissions issues and nearly any command will have to be prefaced with <code>sudo</code>... OR you could just log in as root; so let's do that now. Type and enter <code>sudo su</code>. It will ask for your password. Enter it and afterward you should see you are logged in as root. | |||
Now lets make sure these files are created and give them the correct permissions. These files are used to create a node.js template in Hestia. Enter each of these lines in terminal. | |||
< | <code>touch /usr/local/hestia/data/templates/web/nginx/nodejs3000.sh</code> | ||
<code>touch /usr/local/hestia/data/templates/web/nginx/nodejs3000.tpl</code> | |||
<code>touch /usr/local/hestia/data/templates/web/nginx/nodejs3000.stpl</code> | |||
<code>chmod 777 /usr/local/hestia/data/templates/web/nginx/nodejs3000.sh</code> | |||
<code>chmod 777 /usr/local/hestia/data/templates/web/nginx/nodejs3000.tpl</code> | |||
<code>chmod 777 /usr/local/hestia/data/templates/web/nginx/nodejs3000.stpl</code> | |||
chmod 755 is supposed to work and give only the owner of the file permission to mess with it. But the /src folder is deep in the server and owned by root instead of normal accounts and I couldn't log in as root on nmm that I know of. So I used 777, but feel free to do it correctly instead (if you know how). | |||
== sftp file editing == | |||
Now lets add in what is supposed to go in each of these files. Start the NMM app and log in with the same info you used with Termius. Then touch your files and go to the lowest level and you should see: | Now lets add in what is supposed to go in each of these files. Start the NMM app and log in with the same info you used with Termius. Then touch your files and go to the lowest level and you should see: | ||
[[File:vpsnode5.png]] | |||
If you can't get to the files, you may need to enter in terminal: | |||
<code>sed -i 's/internal-sftp-server.*/internal-sftp/' /etc/ssh/sshd_config</code> | |||
<code>systemctl restart ssh</code> | |||
Navigate to the files you touched; they are at <code>/usr/local/hestia/data/templates/web/nginx/</code>. | Navigate to the files you touched; they are at <code>/usr/local/hestia/data/templates/web/nginx/</code>. | ||
Copy and paste these in to each file and save. Also you will probably have to deal with permissions. | Copy and paste these in to each file and save. Also, to even see files, you will probably have to deal with permissions. It may be handy to know that <code>sudo chmod 777 -R directory</code>, with directory being your target directory, applies the permission to everything in that folder. Tho beware doing that to deeper folders than just your node project. i just did it to /etc and it blew up my whole vps. | ||
Here is the text for nodejs3000.sh | |||
Here is the text for nodejs3000.sh: | |||
<pre>#!/bin/bash | <pre>#!/bin/bash | ||
user=$1 | user=$1 | ||
| Line 72: | Line 80: | ||
chmod 777 "$home/$user/web/$domain/nodeapp/app.sock"</pre> | chmod 777 "$home/$user/web/$domain/nodeapp/app.sock"</pre> | ||
Here is the text for nodejs3000.tpl | {{Info|You could edit this file to change the entrypoint from app.js to something else like server.js}} | ||
Here is the text for nodejs3000.tpl: | |||
<pre>server { | <pre>server { | ||
listen %ip%:%proxy_port%; | listen %ip%:%proxy_port%; | ||
| Line 102: | Line 112: | ||
}</pre> | }</pre> | ||
Here is the text for nodejs3000.stpl | Here is the text for nodejs3000.stpl: | ||
<pre>server { | <pre>server { | ||
listen %ip%:%proxy_port%; | listen %ip%:%proxy_port%; | ||
| Line 142: | Line 152: | ||
}</pre> | }</pre> | ||
== finally node stuff == | |||
At this point you should probably install npm | At this point you should probably install npm and also pm2 to start the app correctly. i had eaddrinuse errors when starting not using pm2. | ||
so do | so do | ||
| Line 152: | Line 162: | ||
finally we are almost there. Now that those three files are correct, go back in to the hestia control panel, to web, to the domain, to advanced options, and under proxy template select nodejs3000. | finally we are almost there. Now that those three files are correct, go back in to the hestia control panel, to web, to the domain, to advanced options, and under proxy template select nodejs3000. | ||
[[File:vpsnode6.jpg]] | |||
finally we are to the simple node stuff | finally we are to the simple node stuff | ||
in termius use cd to navigate to the directory referenced by the template: | in termius use cd to navigate to the directory referenced by the template: | ||
<code>cd /home/admin/web/allo.helioho.st/nodeapp</code> | <code>cd /home/admin/web/allo.helioho.st/nodeapp</code> | ||
Use your domain instead of allo.helioho.st. | Use your domain instead of allo.helioho.st. | ||
{{Caution|also people will tell you to make a new user account instead of do it under admin. I didn't tho. I just wanted to complete the process of getting a node site fully online; not delve in to accounts.}} | |||
{{Info|Making my first real site after this tutorial; I started with making a dedicated account for it.}} | |||
now we npm init in that folder to start a node project: | now we npm init in that folder to start a node project: | ||
<code>npm init -y</code> | |||
Now here is a starter hello world node file. | Now here is a starter hello world node file. | ||
<pre>const http = require('http'); // Import the built-in http module | <pre>const http = require('http'); // Import the built-in http module | ||
| Line 190: | Line 198: | ||
});</pre> | });</pre> | ||
{{Danger|All these places in files that say ip 127.0.0.1 keep them like that. Don't use your own ip. It's supposed to say 127.0.0.1.}} | |||
in termius terminal be cd'd in to that folder and type: | Open up nmm again and navigate to <code>/home/admin/web/allo.helioho.st/nodeapp</code> and create a file named app.js and paste in the code. | ||
<code> | |||
pm2 start app.js | In termius terminal be cd'd in to that folder and type: | ||
</code> | <code>pm2 start app.js</code> | ||
Now go to your domain and it should say hello world :) | Now go to your domain and it should say hello world :) | ||
{{Info|to run multiple domains, make a template for each. Have your second node project use port 3001 instead of 3000. You would then repeat the steps of touching, chmodding, and editing the three node3000 files, but this time call them node3001 and change the ports mentioned in them from 3000 to 3001. Then, as the template on your second node project, you would select node3001 instead of node3000.}} | |||
[https://wiki.helionet.org/VPS_Domain here]'s what i did next; setting up custom domains. | |||
Latest revision as of 20:47, 7 October 2025
Getting Started
In https://heliohost.org/chat/, say you are getting a VPS and would like it to come with Hestia installed on it. Hestia is the control panel we will be using. If you don't want to pay with PayPal, you may also ask for an alternate payment link.
You should get an email listing your dedicated IP, port, and other info for logging in. You will need an SFTP client such as FileZilla to upload files, as well as an SSH client. I personally use and prefer https://termius.com/, because I like the terminal and it doesn't weirdly close for no reason. I also use NMM File Manager from the Google Play Store for editing the files of the server, since Termius can't do that.
In to Hestia
Before we log in to the apps, let's try logging in to Hestia. In your email see where it says your domain is vps###.heliohost.us? ### refers to your specific number in the email. Add a :8083 so the link is vps###.heliohost.us:8083 and go to it in your browser. You should find a login page with the username being 'admin' and password being your password. Enter those and you are in the Hestia Control Panel. Explore around it a bit.
Now lets change account setting from nologin to bash, and link our first domain.
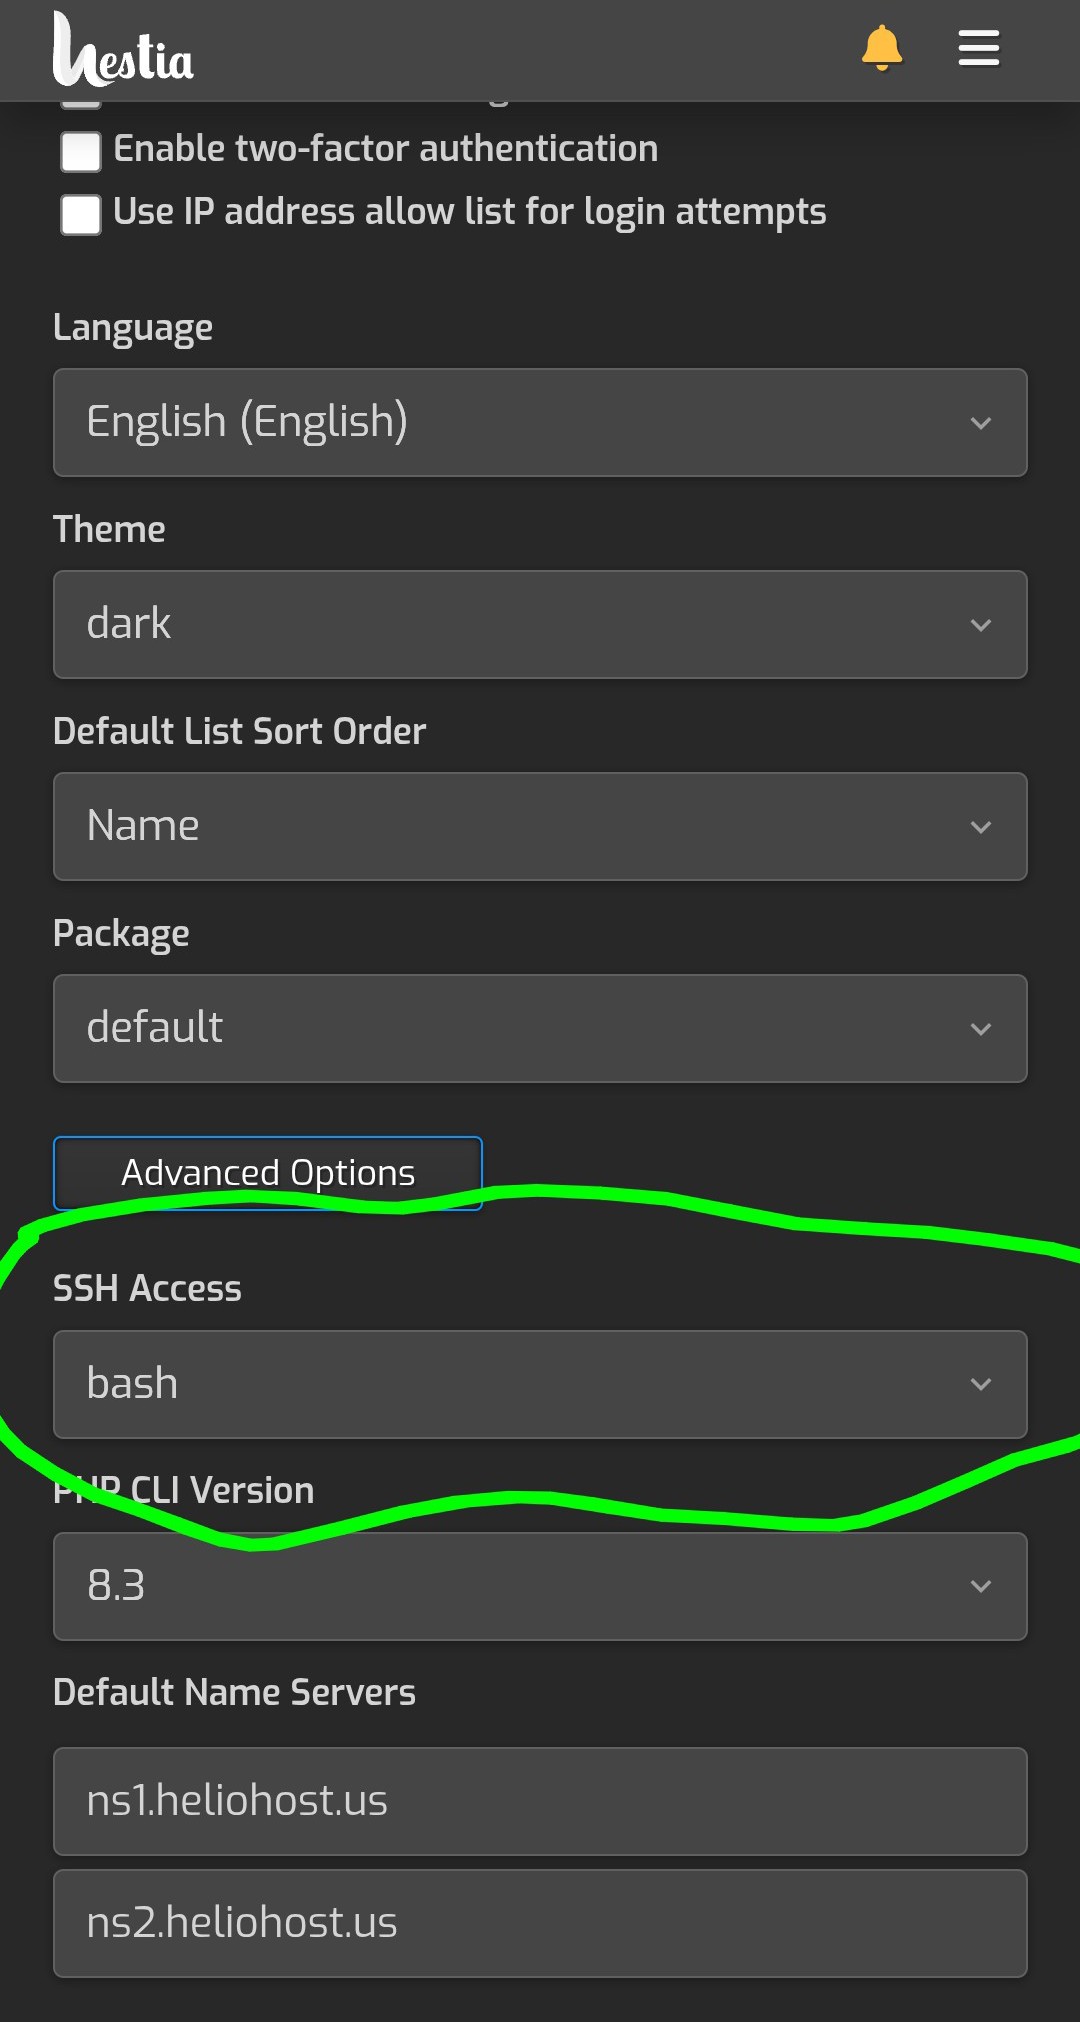
To change from nologin to bash, touch the three bars below the top three bars, go to users, and touch the admin user. Go to the bottom where it says Advanced Options, and change nologin to bash.
Now lets add a domain so u can have the node site online somewhere. If you ask in support chat they can give you a free heliohost domain to build with.
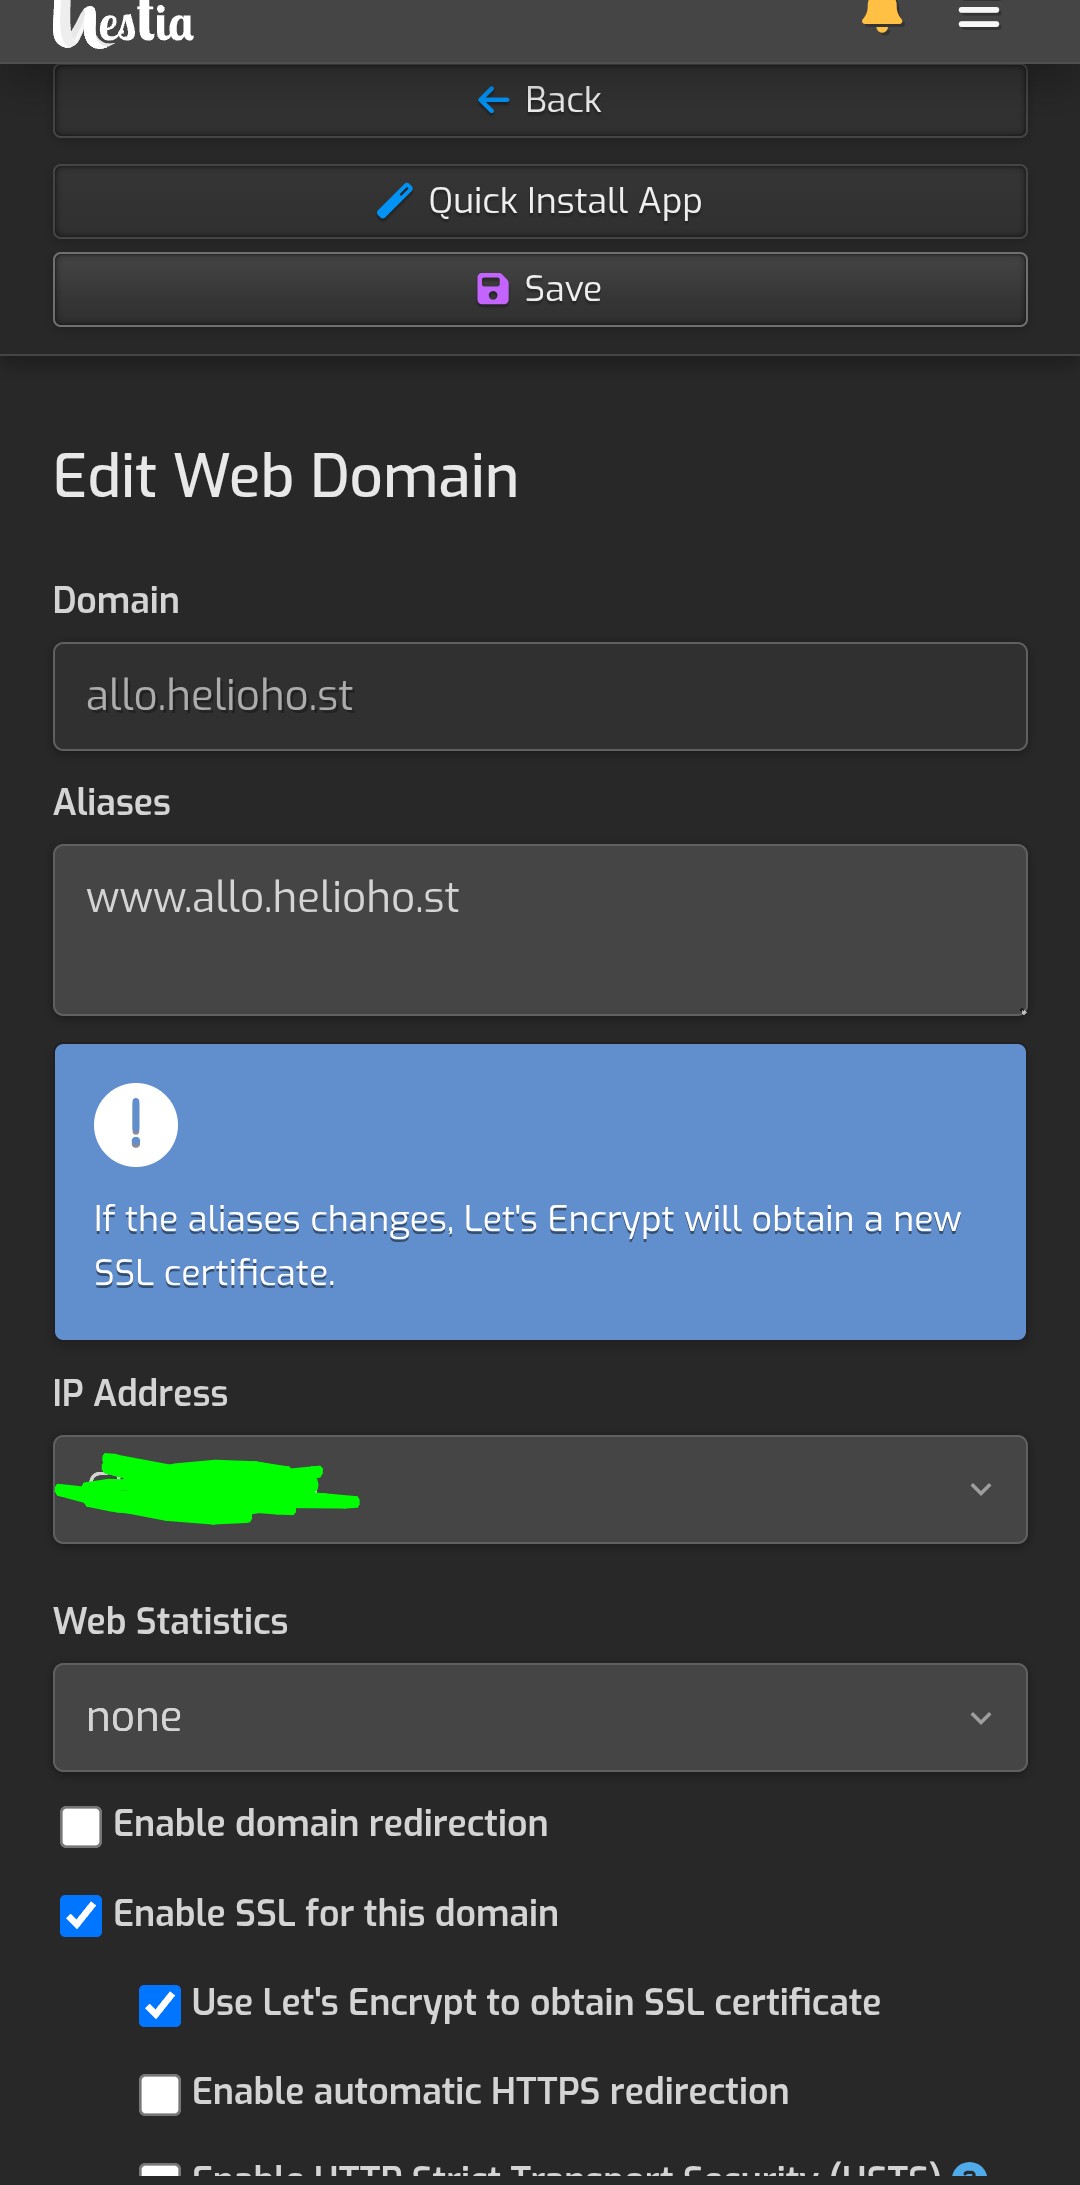
Touch the 3 bars again and go to Web. Add a new domain with the address and ip. Enable SSL in advanced options. Mine looks like this.
Terminal Stuff
Now let's open Termius and log in. I would take screenshots but Termius doesn't let me. Skip the logging in and ai stuff of termius and go straight to Hosts and make a new host. Set the ip to either of the ips from your email. I use the ipv6 one and no idea if there are limitations using the ipv4 one or not. :)
port should already be on 22 correctly and enter username admin and your password.
You will find terminal stuff is filled with Permissions issues and nearly any command will have to be prefaced with sudo... OR you could just log in as root; so let's do that now. Type and enter sudo su. It will ask for your password. Enter it and afterward you should see you are logged in as root.
Now lets make sure these files are created and give them the correct permissions. These files are used to create a node.js template in Hestia. Enter each of these lines in terminal.
touch /usr/local/hestia/data/templates/web/nginx/nodejs3000.sh
touch /usr/local/hestia/data/templates/web/nginx/nodejs3000.tpl
touch /usr/local/hestia/data/templates/web/nginx/nodejs3000.stpl
chmod 777 /usr/local/hestia/data/templates/web/nginx/nodejs3000.sh
chmod 777 /usr/local/hestia/data/templates/web/nginx/nodejs3000.tpl
chmod 777 /usr/local/hestia/data/templates/web/nginx/nodejs3000.stpl
chmod 755 is supposed to work and give only the owner of the file permission to mess with it. But the /src folder is deep in the server and owned by root instead of normal accounts and I couldn't log in as root on nmm that I know of. So I used 777, but feel free to do it correctly instead (if you know how).
sftp file editing
Now lets add in what is supposed to go in each of these files. Start the NMM app and log in with the same info you used with Termius. Then touch your files and go to the lowest level and you should see:
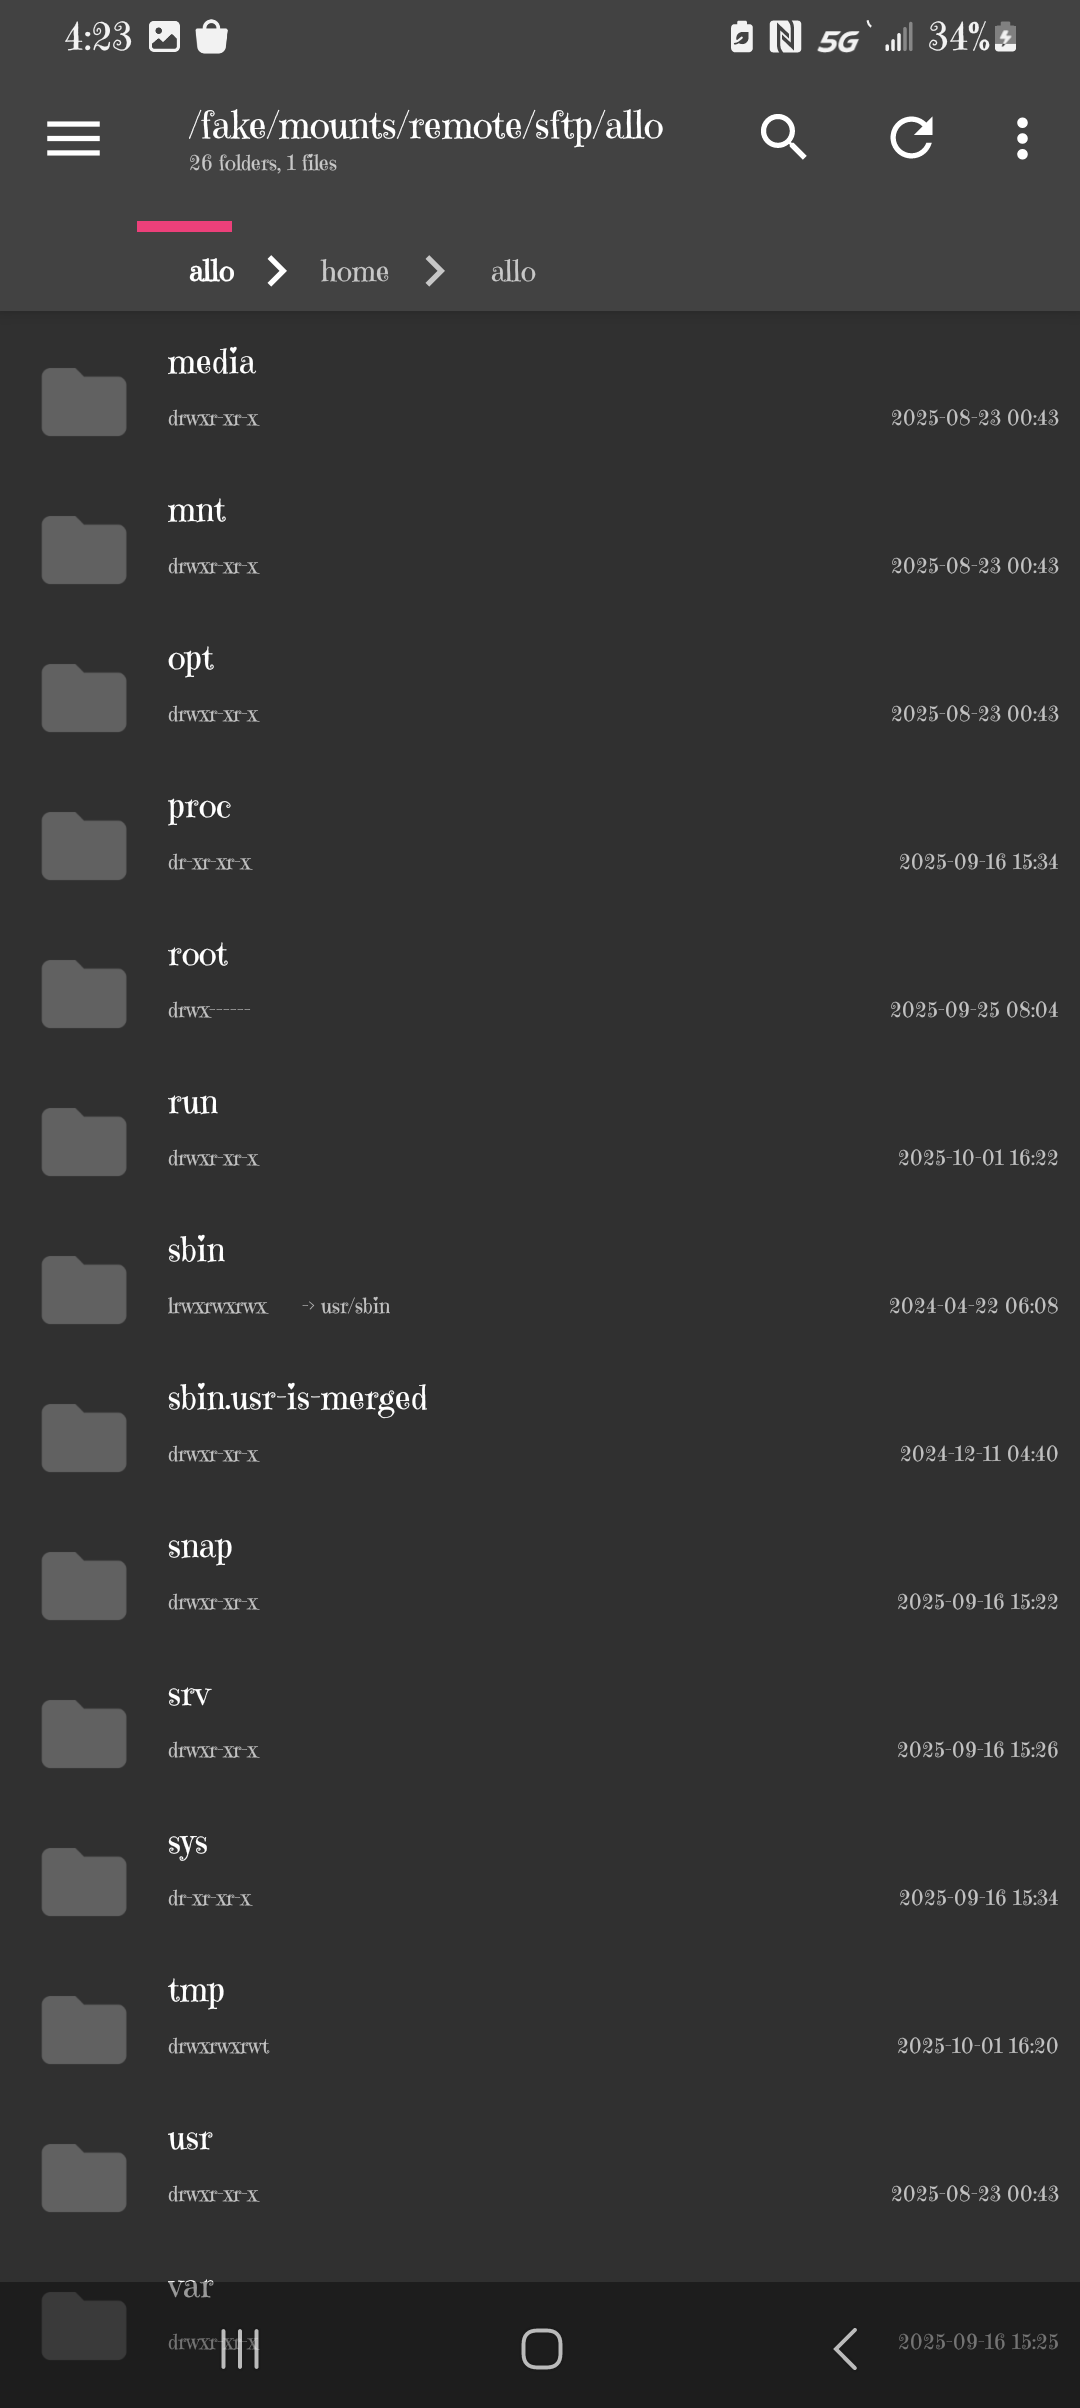
If you can't get to the files, you may need to enter in terminal:
sed -i 's/internal-sftp-server.*/internal-sftp/' /etc/ssh/sshd_config
systemctl restart ssh
Navigate to the files you touched; they are at /usr/local/hestia/data/templates/web/nginx/.
Copy and paste these in to each file and save. Also, to even see files, you will probably have to deal with permissions. It may be handy to know that sudo chmod 777 -R directory, with directory being your target directory, applies the permission to everything in that folder. Tho beware doing that to deeper folders than just your node project. i just did it to /etc and it blew up my whole vps.
Here is the text for nodejs3000.sh:
#!/bin/bash
user=$1
domain=$2
ip=$3
home=$4
docroot=$5
mkdir "$home/$user/web/$domain/nodeapp"
chown -R $user:$user "$home/$user/web/$domain/nodeapp"
rm "$home/$user/web/$domain/nodeapp/app.sock"
runuser -l $user -c "pm2 start $home/$user/web/$domain/nodeapp/app.js"
sleep 5
chmod 777 "$home/$user/web/$domain/nodeapp/app.sock"
Here is the text for nodejs3000.tpl:
server {
    listen %ip%:%proxy_port%;
    server_name %domain_idn% %alias_idn%;
    error_log /var/log/%web_system%/domains/%domain%.error.log error;

    location / {
        proxy_pass http://127.0.0.1:3000;
        proxy_http_version 1.1;
        proxy_set_header Upgrade $http_upgrade;
        proxy_set_header Connection 'upgrade';
        proxy_set_header Host $host;
        proxy_cache_bypass $http_upgrade;
    }
    location /error/ {
        alias %home%/%user%/web/%domain%/document_errors/;
    }

    location @fallback {
        proxy_pass http://127.0.0.1:3000:/$1;
    }
    location ~ /\.ht {return 404;}
    location ~ /\.svn/ {return 404;}
    location ~ /\.git/ {return 404;}
    location ~ /\.hg/ {return 404;}
    location ~ /\.bzr/ {return 404;}

    include %home%/%user%/conf/web/nginx.%domain%.conf*;
}
Here is the text for nodejs3000.stpl:
server {
    listen %ip%:%proxy_port%;
    server_name %domain_idn% %alias_idn%;
    return 301 https://%domain_idn%$request_uri;
}
server {
    listen %ip%:%proxy_ssl_port% http2 ssl;
    server_name %domain_idn% %alias_idn%;
    ssl_certificate %ssl_pem%;
    ssl_certificate_key %ssl_key%;
    error_log /var/log/%web_system%/domains/%domain%.error.log error;
    gzip on;
    gzip_min_length 1100;
    gzip_buffers 4 32k;
    gzip_types image/svg+xml svg svgz text/plain application/x-javascript text/xml text/css;
    gzip_vary on;
    location / {
        proxy_pass http://127.0.0.1:3000;
        proxy_http_version 1.1;
        proxy_set_header Upgrade $http_upgrade;
        proxy_set_header Connection 'upgrade';
        proxy_set_header Host $host;
        proxy_cache_bypass $http_upgrade;
    }
    location /error/ {
        alias %home%/%user%/web/%domain%/document_errors/;
    }
    location @fallback {
    proxy_pass https://127.0.0.1:3000:/$1;
    }
    location ~ /\.ht {return 404;}
    location ~ /\.svn/ {return 404;}
    location ~ /\.git/ {return 404;}
    location ~ /\.hg/ {return 404;}
    location ~ /\.bzr/ {return 404;}

    include %home%/%user%/conf/web/%domain%/nginx.ssl.conf_*;
}
finally node stuff
At this point you should probably install npm and also pm2 to start the app correctly. i had eaddrinuse errors when starting not using pm2. so do
apt update && apt install npm -y
npm install pm2 -g
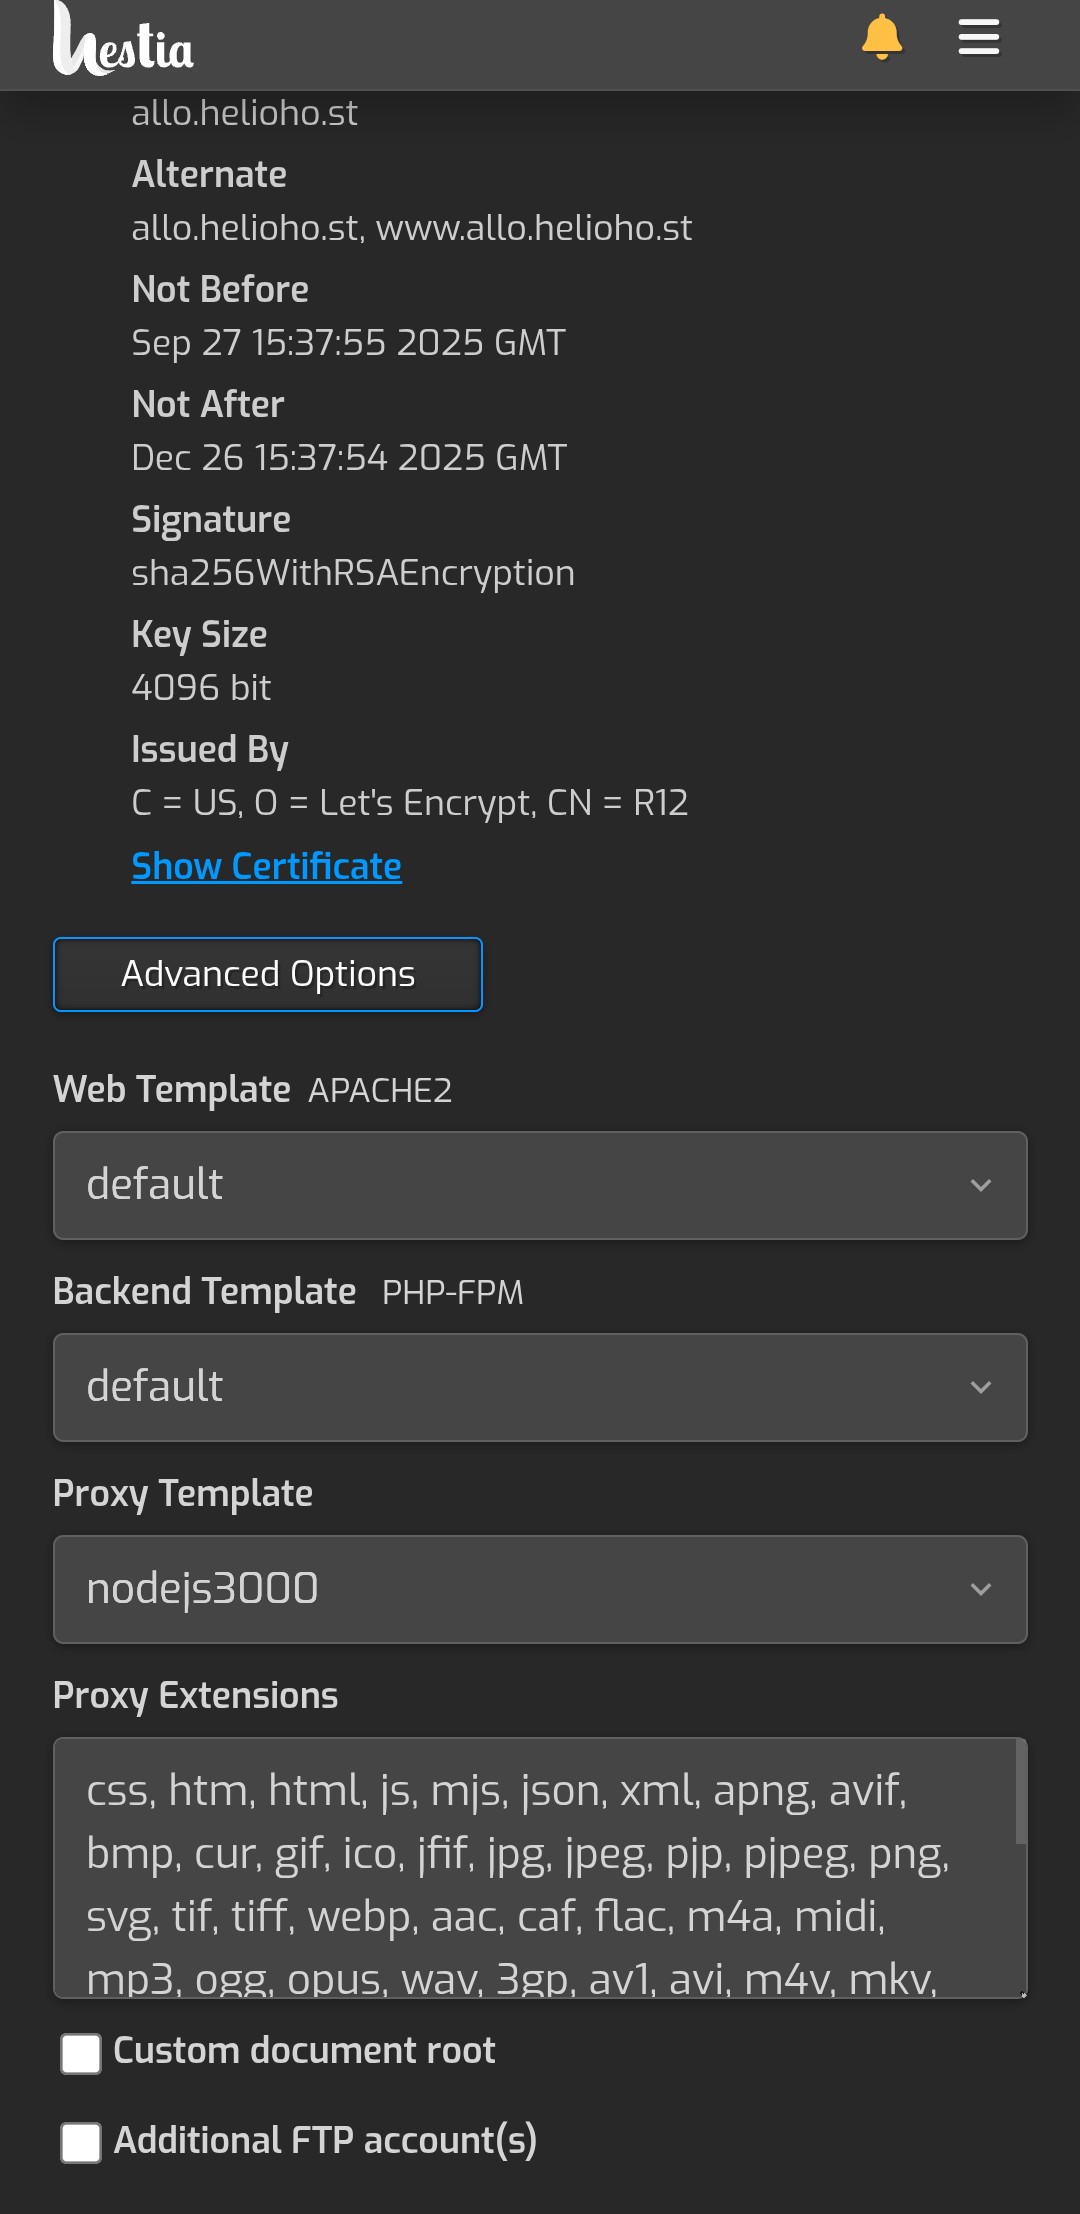
finally we are almost there. Now that those three files are correct, go back in to the hestia control panel, to web, to the domain, to advanced options, and under proxy template select nodejs3000.
 finally we are to the simple node stuff
in termius use cd to navigate to the directory referenced by the template:
cd /home/admin/web/allo.helioho.st/nodeapp
Use your domain instead of allo.helioho.st.

also people will tell you to make a new user account instead of do it under admin. I didn't tho. I just wanted to complete the process of getting a node site fully online; not delve in to accounts.
now we npm init in that folder to start a node project:
npm init -y
Now here is a starter hello world node file.
const http = require('http'); // Import the built-in http module

    const hostname = "127.0.0.1"
    const port = 3000; // Port to listen on

    // Create a server instance
    const server = http.createServer((req, res) => {
      // Set the response header
      res.writeHead(200, { 'Content-Type': 'text/plain' });

      // Send the response body
      res.end('Hello, World!\n');
    });

server.on('listening',function(){
    console.log('ok, server is running');
});

    // Start the server and listen for incoming requests
    server.listen(port, hostname, () => {
      console.log(`Server running at http://${hostname}:${port}/`);
    });

All these places in files that say ip 127.0.0.1 keep them like that. Don't use your own ip. It's supposed to say 127.0.0.1.
Open up nmm again and navigate to /home/admin/web/allo.helioho.st/nodeapp and create a file named app.js and paste in the code.
In termius terminal be cd'd in to that folder and type:
pm2 start app.js
Now go to your domain and it should say hello world :)

to run multiple domains, make a template for each. Have your second node project use port 3001 instead of 3000. You would then repeat the steps of touching, chmodding, and editing the three node3000 files, but this time call them node3001 and change the ports mentioned in them from 3000 to 3001. Then, as the template on your second node project, you would select node3001 instead of node3000.
here's what i did next; setting up custom domains.
