Golang: Difference between revisions
m KazVee moved page Golang as CGI to Golang without leaving a redirect |
m Update to use H2 headers for better readability |
||
| (5 intermediate revisions by the same user not shown) | |||
| Line 9: | Line 9: | ||
== How to get Started with Go == | == How to get Started with Go == | ||
Go is a compiled language so you'll need to build the code on your development system, and then upload the executable. For this example, we will be using Windows 10 for development. In order to build the Go language you'll need to install the compiler. | Go is a compiled language so you'll need to build the code on your development system, and then upload the executable. For this example, we will be using Windows 10 for development. In order to build the Go language you'll need to install the compiler. | ||
[https://golang.org/dl | Go to [https://golang.org/dl/ golang.org/dl/] to download and install the version for your OS. | ||
== Create the Source File on the Development System == | == Create the Source File on the Development System == | ||
| Line 21: | Line 21: | ||
</pre> | </pre> | ||
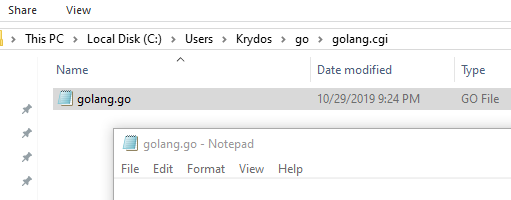
In that directory, create a new file named | In that directory, create a new file named 'golang.go' and open it in Notepad. | ||
[[File:golang_notepad.png]] | |||
Copy and paste this code into the Notepad window: | Copy and paste this code into the Notepad window: | ||
| Line 48: | Line 48: | ||
</pre> | </pre> | ||
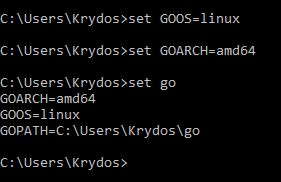
This will output all of your environment variables that start with | This will output all of your environment variables that start with 'go'. There should be just one, your 'GOPATH'. | ||
[[File:set_go.png]] | |||
You can set new environment variables using that same set command. Type these two commands: | You can set new environment variables using that same set command. Type these two commands: | ||
<pre> | <pre> | ||
set GOOS=linux | set GOOS==linux | ||
set GOARCH=amd64 | set GOARCH==amd64 | ||
</pre> | </pre> | ||
and then run | and then run 'set go' again to check that they saved correctly. | ||
[[File:goos_goarch.png]] | |||
If you close this command window and open a new one, those environment variables will be gone and you'll need to set them again so get in the habit of checking the | If you close this command window and open a new one, those environment variables will be gone and you'll need to set them again so get in the habit of checking the 'set go' command output. | ||
== Build the Executable == | == Build the Executable == | ||
| Line 79: | Line 79: | ||
</pre> | </pre> | ||
'''Note:''' If the | '''Note:''' If the 'go build' command does not work, you may need to use 'go build golang.go' instead. | ||
[[File:go_build.png]] | |||
If everything goes well, you should now have an executable named | If everything goes well, you should now have an executable named 'golang.cgi'. | ||
[[File:golang_compiled.png]] | |||
== Upload the Executable and Set Permissions == | == Upload the Executable and Set Permissions == | ||
| Line 91: | Line 91: | ||
Log in to Plesk and open the File Manager. | Log in to Plesk and open the File Manager. | ||
[[File:file_manager.png]] | |||
Navigate to the | Navigate to the 'httpdocs/cgi-bin' directory, click the '+' button and select 'Upload File'. (If you were transferred from the old cPanel, the webroot directory will be named 'public_html'.) | ||
Locate the | Locate the 'golang.cgi' file on your hard drive and upload it. | ||
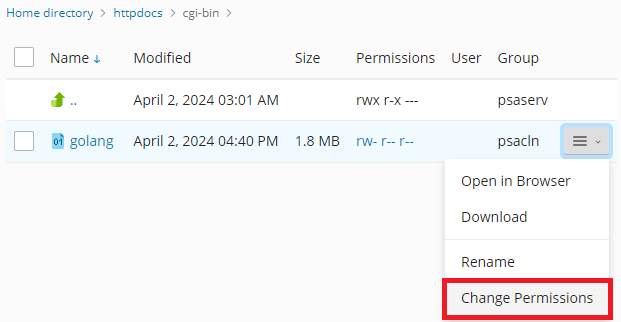
Highlight the | Highlight the 'golang.cgi' file and select 'Change Permissions'. | ||
[[File:plesk_change_permissions.png]] | |||
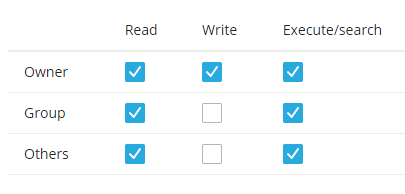
Check the 3 | Check the 3 'Execute / Search' boxes to set the permissions to '755' to make the file executable. | ||
[[File:755_permissions.png]] | |||
Make sure that you now see | Make sure that you now see 'rwx r-x r-x' ('755') displayed for this file in the Permissions column. | ||
== Test the Golang CGI == | == Test the Golang CGI == | ||
Highlight the | Highlight the 'golang.cgi' file and select 'Open in Browser' (Or manually navigate to: '<your subdomain>.heliohost.org/cgi-bin/golang.cgi'.) | ||
If everything is working you should see | If everything is working you should see 'GoLang as CGI is working...' displayed in your browser. | ||
[[File:golang_working.png]] | |||
If it doesn't work, go back and check all of your steps again. If you can't figure out what is wrong, please post in the [https://helionet.org/index/forum/45-customer-service/?do=add Customer Service forum], making sure to provide your '''username''' and any '''error messages''' you are encountering. We'd be happy to help. | If it doesn't work, go back and check all of your steps again. If you can't figure out what is wrong, please post in the [https://helionet.org/index/forum/45-customer-service/?do==add Customer Service forum], making sure to provide your '''username''' and any '''error messages''' you are encountering. We'd be happy to help. | ||
Latest revision as of 17:05, 17 January 2025
Golang as CGI
Preface
This guide will work on any of the HelioHost servers.
The Go programming language, often called Golang, is an open source project to make programmers more productive. Go is expressive, concise, clean, and efficient. Its concurrency mechanisms make it easy to write programs that get the most out of multi-core and networked machines, while its novel type system enables flexible and modular program construction. Go compiles quickly to machine code yet has the convenience of garbage collection and the power of run-time reflection. It's a fast, statically typed, compiled language that feels like a dynamically typed, interpreted language.
How to get Started with Go
Go is a compiled language so you'll need to build the code on your development system, and then upload the executable. For this example, we will be using Windows 10 for development. In order to build the Go language you'll need to install the compiler.
Go to golang.org/dl/ to download and install the version for your OS.
Create the Source File on the Development System
Create a directory for the Go source. In this example, we used:
C:\Users\Krydos\go\golang.cgi\
In that directory, create a new file named 'golang.go' and open it in Notepad.
Copy and paste this code into the Notepad window:
package main

import "fmt"

func main() {
  fmt.Printf("Content-type: text/html\n\n")
  fmt.Printf("GoLang as CGI is working...")
}
Make sure to Save the file in Notepad.
Set the Environment Variables
By default, Go will build the executable to run on your local system, which is Windows. We want to run the executable on HelioHost's server so we need to tell the compiler to make an executable that will work on Linux. Open a new command prompt, and run the command
set go
This will output all of your environment variables that start with 'go'. There should be just one, your 'GOPATH'.
You can set new environment variables using that same set command. Type these two commands:
set GOOS==linux
set GOARCH==amd64
and then run 'set go' again to check that they saved correctly.
If you close this command window and open a new one, those environment variables will be gone and you'll need to set them again so get in the habit of checking the 'set go' command output.
Build the Executable
In the same command prompt window that you set the environment variables, change directory to your source file that you created earlier.
cd go\golang.cgi
and then run the command:
go build
Note: If the 'go build' command does not work, you may need to use 'go build golang.go' instead.
If everything goes well, you should now have an executable named 'golang.cgi'.
Upload the Executable and Set Permissions
Log in to Plesk and open the File Manager.
Navigate to the 'httpdocs/cgi-bin' directory, click the '+' button and select 'Upload File'. (If you were transferred from the old cPanel, the webroot directory will be named 'public_html'.)
Locate the 'golang.cgi' file on your hard drive and upload it.
Highlight the 'golang.cgi' file and select 'Change Permissions'.
Check the 3 'Execute / Search' boxes to set the permissions to '755' to make the file executable.
Make sure that you now see 'rwx r-x r-x' ('755') displayed for this file in the Permissions column.
Test the Golang CGI
Highlight the 'golang.cgi' file and select 'Open in Browser' (Or manually navigate to: '<your subdomain>.heliohost.org/cgi-bin/golang.cgi'.)
If everything is working you should see 'GoLang as CGI is working...' displayed in your browser.
If it doesn't work, go back and check all of your steps again. If you can't figure out what is wrong, please post in the Customer Service forum, making sure to provide your username and any error messages you are encountering. We'd be happy to help.


